App Settings
Configure features that are not related to data model in app settings
- Set app parameters required by WordPress plugin generation
- Track development progress through changelog and version number
- Customize WordPress Admin look and feel
- Enable or disable WPAS modules
- Create plugin activation notices for users
- Include App level CSS, Images and Fonts
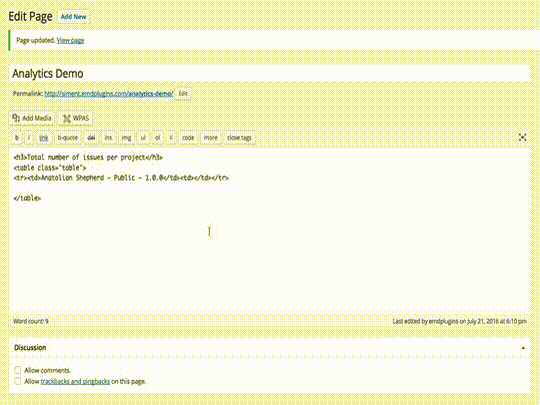
Analytics module allows filtering entity attributes, taxonomies and relationships to calculate statistics and displaying the result in any page using a shortcode.
Read MoreAnalytics module can use the following functions in calculations;
- COUNT
- SUM
- MAX
- MIN
- AVG
- STDDEV_POP
- STDDEV_SAMP
- VAR_POP
- VAR_SAMP
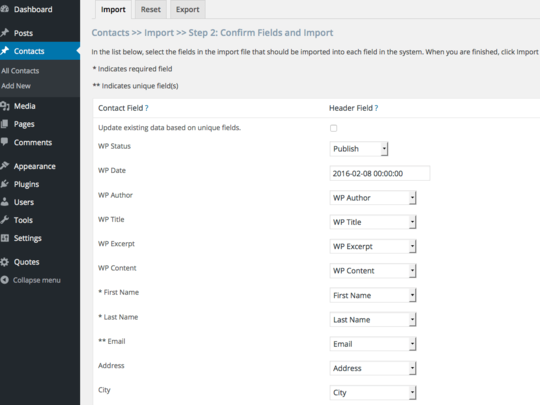
Administrators can import, export and reset app data from/to CSV files using operations module. Operations module is enabled in Misc. tab of Setting page. If operations is enabled WPAS creates an "Operations" button in app list screen next to the "Add New" button in the admin area.
The operations module is specifically designed for each and every WPAS app based on the app design.
Read MoreYou must be logged in as administrator to access Operations screen.
Operations module enforces data integrity by:
- checking data rules such as required, unique attributes, auto-increment etc.
- checking app rules such as data existence in term of relationships
- checking compliance with WordPress API rules
Advanced filters module allows using search operators to create and track static and dynamic segments of your data. These segments can be saved and recalled on demand.
Attributes, taxonomies and relationships can be used in filters. Attributes must be defined "filterable" to be included in the dropdown.
Read MoreUsing the advanced filters, you can;
- Change the order of columns
- Add or remove columns from displaying in the list
- Create filters using one to many conditions. For example, you can create a filter displaying on only people living in 33180 zip code and quoted more than $3000.
- Save filters to see only content matching your criteria. Once you save a filter, it becomes available in a dropdown
- You can export selected records to CSV or PDF files if you enabled this feature in your design
Allows to visually create basic or advanced shortcodes to customize the data returned from views.
Visual shortcode builder allows filtering your content by attributes, globals, taxonomies, relationships and more.
Read MoreTo create a WPAS shortcode:
- Create a new page
- Click on WPAS button
- Find and select the view or form you’d like to use a base
- Modify the shortcode by adding taxonomy or attribute filters
- Don’t forget to click + icon every time you add a filter
- You can create as many filters as you need in the same shortcode
- When you finished, click Insert Shortcode button. The shortcode will be inserted to the page
- Update or publish the page to see the shortcode result
- You can create as many shortcodes as you need
- You can also use multiple shortcodes on the same page
App settings include some optional as well as required information that must be filled before sending your app for code generation. In summary, app setting contains optional and required fields to:
- Customize overall look and feel of WordPress Admin screen
- Set required information for plugin readme.txt
- Store and link app level files
- Enable/disable optional WPAS modules
The general descriptions of what can be done in app settings tabs are below:
- App Info: Contains the information required to create WordPress readme.txt and translation pot file. You can use changelog and version to keep track of your progress as well
- Navigation: enables or disable WordPress admin navigation menus
- Dashboard: removes all default dashboard widgets and sets number of WordPress Dashboard columns
- Toolbar: Displays or hides admin toolbar from backend, frontend or both
- Login: Replaces WordPress logo in the login with an image and uses the same image in the admin toolbar
- Footer: Sets the backend left and right footer text
- Mail: Set the default WordPress email address and name for system emails
- Notices: Creates up to 3 admin notices which are shown in WordPress admin after plugin activation and updates. Use them to share links with users such as plugin documentation, live demo location etc.
- Misc: Includes checkboxes to enable or disable WPAS modules as well as text areas to store app level CSS, image and font files. Image and font files are locally downloaded can be referenced in layouts or CSS files using IMGDIR which points to image directory and FONTDIR which points to fonts directory of your app. In addition, jQuery UI theme of jQuery components can set here and applied app-wide.
WPAS plugin updates can be received through WordPress Plugins page if your WPAS edition supports this feature.
To be able to get updates, you must have an active app license key which is sent through email after your first generation.
The app license key must be entered in License page of your app setting menu to start getting updates. You receive a plugin update notice after your app code gets generated with a new version. You may need to install additional libraries to make all this work.
Read MoreIf you're not able to get update notices in Plugins page, make sure:
- Your license is valid. Go to the settings menu of your plugin and click to Licenses page. The text next to your license key should say "Valid".
- If you are behind a firewall, the outgoing connection is open.
- License text is entered without any preceding or trailing space.
- License text is entered correctly.
- Type in the command line : curl -s https://wpappstudio.com , it should return text


