Relationships are connections between entities. A relationship captures how entities are related to one another. For example, customers place orders, customers live at addresses, and line items are part of orders.
Wp App Studio can be configured to enforce and display advanced level relationships between two entities or within an entity.
Cardinality and Optionality
WPAS allows to specify the cardinality and optionality of a relationship. Cardinality represents the concept of "how many are connected" whereas optionality represents the concept of "whether a relationship is required." For example, in a relationship between customers and orders, cardinality and optionality can be identified by asking "How many orders can one customer place". The answer could be none, one, or multiple orders.
Cardinality concept is defined in "Type" attribute of the relationship screen. You can choose one-to-many or many-to-many types. Optionality concept is defined in "Required" attribute. For example, in a relationship between customers and orders, one customer may place one or many orders (Cardinality) and to be a customer one must have a valid order.(Optionality) To be able to define this relationship you should choose, One-to-Many in "Type" dropdown and check "Required" checkbox.
When one-to-many attribute type is selected in the example above, Wp App Studio enforces customer-orders relationship by allowing users select only one customer associated with an order. Checking "Required" field also enforces the rule that every customer must have at least one valid order. The relationship rules are enforced both in the backend and frontend interfaces.
Entity Roles
Entities play roles in other entities through relationships. WPAS relationships implement entity roles as entity titles. For example, in a one-to-many relationship between Projects and Members entities, on the Project entity side to role played by Members entity "Members" specifying members assigned to the project. On the members side you could use "Assigned Projects" specifying the projects assigned to a team member. When the app code generated, you will see relationship connection box titles will display titles in the backend and the relationship dropdown title in the frontend.
Entity roles feature is optional. If you leave "from" and "to" entity titles blank, WPAS will default to the correct entity title. However, if you decide to create multiple relationships between two entities, you need to specify entity roles in the title fields to avoid confusion on the frontend and backend interfaces.
Connection Types
Each entity can have connected or related connection types. Once you set the relationships to other entities from the backend or frontend, you will be able to display them in your views or relationship widgets.
Connected type refers to the connections that exist between entities related to each other in a one-to-many or many-to-many relationship. It shows the "many" side of the relationship on the "one" side. For example; in a customer to orders relationship (1-M), you can display the orders that a customer made on a page showing a specific customer. In a Many to Many relationship such as Product and Orders, a product page can display the product orders made and orders page can display the products included in that specific order. Connected types can be shown by checking Connected Frontend Display checkbox and and filling out optional entity title fields. In addition, you can display the relationship attribute data below the connected type data.
Related types are the ones display related objects of the same entity in a many-to-many relationship. For example, in a Product to Orders many-to-many relationship, a product page can display the products included in the same order. Related types are only applicable in many-to many relationships. Related connections can be shown by checking Related Frontend Display checkbox and filling out optional entity title fields. Related connections dynamically calculated, you can not manually set them.
The following describes the relationship fields.
- Relationship Name (WPAS 2.9)
- Relationship name should be in slug form (must not contain capital letters or spaces) and not more than 32 characters long. Previously used relationship names are not allowed. Underscores are allowed.
- From Entity Name
- Sets the "From Entity" in a relationship.
- From Entity Title
- Sets the "From Entity" title.
- To Entity Name
- Sets the "To Entity" in a relationship.
- To Entity Title
- Sets the "TO Entity" title.
- Reciprocal (WPAS 4.6)
- Used in self-relationships in which -from- and -to- entities are the same. Relationship entity record appears both in the -from- entity and in the -to- entity relationship boxes when checked. For example, in a article to article relatioship, you may wantto display related articles. In this case, you should set reciprocal because there is a many-to-many relationship between articles. If there is a one-to-many relationship between the records of the same entity, you should uncheck reciprocal. For example, in a manager to staff relationship. Both managers and staff are employees. One manager may supervise many staff. In this relationship, there will be one relationship box which display Manager or Direct reports depending on what you want to display. When reciprocal set, WPAS allows to use -from- and -to- relationship tags in view layouts.
- Type
- Pick the type of relationship between TO and FROM entity. In a one-to-many relationship, each record in the related to entity can be related to many records in the relating entity. For example, in a customer to an invoice relationship each customer can have many invoices but each invoice can only be generated for a single customer. In a many-to-many relationship, one or more records in a entity can be related to 0, 1 or many records in another entity. For example, Each customer can order many products and each product can be ordered by many customers.
- Box Display
- Pick the location of relationship metabox. The metabox will be displayed in the editor screen of the selected from-entity or both.
- Main Column Display
- When set, WPAS displays the relationship box in the main column of the entity editor instead of the side column(default). This will allocate more space when defining connections. The relationships with attributes are by default allocated to the main column.
- List Column Display
- You can display related entity objects in the entity list of from-entity, to-entity or choose not to display at all. List Column Display sets where relationship column will be displayed when viewing lists of an entity records.
- Required for Submit (WPAS 2.0)
- Sets the relationship required for data entry. When checked WPAS will not allow any data entry unless a value is selected from the relationship dropdown list.
- Required for Search (WPAS 2.2)
- Sets the relationship required for searches. When checked WPAS will not allow any search request go through unless a value is selected from the relationship dropdown list. Used in search forms only.
- Description (WPAS 2.0)
- Used to display instructions to user on the frontend as helptip.
- Display Connected in Frontend (WPAS 1.8)
- When checked, it displays the connected relationship data on the frontend. For example; you have a relationship between products and orders. One product may be ordered multiple times. On a product page, connected option will show the order records that the same product is ordered.
- Display Related in Frontend (WPAS 1.8)
- When checked, it displays the related relationship data on the frontend. For example; you have a many to many relationship between products and orders One product may be ordered multiple times. One order may include multiple products. On a product page, related option will show the products that are ordered in the same connected order. This option can be used only in Many-to-Many relationships.
- From Entity Title - Connected (WPAS 1.8)
- Sets the connected relationship title on the - from entity - backend and default entity(entity without a single view) frontend.
- To Entity Title -Connected (WPAS 1.8)
- Sets the connected relationship title on the - to entity - backend and default entity(entity without a single view) frontend.
- Display Type - Connected (WPAS 1.8)
- Sets how the connected relationship data will be displayed on the frontend. Standard ,Ordered List, Comma Seperated List, and Unordered List are the options. Standard option creates a div which wraps all relationship data.
- Connected Relationship Attributes Display (WPAS 1.8)
- When checked, it displays the connected relationship attribute data on the frontend.
- From Entity Title - Related (WPAS 1.8)
- Sets the related relationship title on the - from entity - backend and default entity(entity without a single view) frontend. This option can be used only in Many-to-Many relationships.
- To Entity Title - Related (WPAS 1.8)
- Sets the related relationship title on the - to entity - backend and default entity(entity without a single view) frontend. This option can be used only in Many-to-Many relationships.
- Display Type - Related (WPAS 1.8)
- Sets how the related relationship data will be displayed on the frontend. Standard ,Ordered List, Comma Seperated List, and Unordered List are the options. Standard option creates a div which wraps all relationship data. This option can be used only in Many-to-Many relationships.
- Limit By Role (WPAS 3.0)
- Limits the relationship to the group of users who belong to the selected role. Builtin roles: Super Admin - Someone with access to the blog network administration features controlling the entire network (See Create a Network). Administrator - Somebody who has access to all the administration features. Editor - Somebody who can publish and manage posts and pages as well as manage other users's posts, etc. Author - Somebody who can publish and manage their own posts. Contributor - Somebody who can write and manage their posts but not publish them. Subscriber - Somebody who can only manage their profile. If you predefined custom roles, you can select them as well. You can create multiple user relationships with the same entity and limit them by different roles. User to User relationships are not allowed.
- From Entity Layout (WPAS 3.0)
- Sets the layout of a single -from entity- record of your view. You can also edit the source code, add entity attributes, taxonomies.
- To Entity Layout (WPAS 3.0)
- Sets the layout of a single -to entity- record of your view. You can also edit the source code, add entity attributes, taxonomies.
- To Entity Header - Connected (WPAS 4.1)
- Sets the header wrap code for To Entity in a connected relationship type.
- To Entity Footer - Connected (WPAS 4.1)
- Sets the footer wrap code for To Entity in a connected relationship type.
- To Entity Header - Related (WPAS 4.1)
- Sets the header wrap code for To Entity in a related relationship type.
- To Entity Footer - Related (WPAS 4.1)
- Sets the footer wrap code for To Entity in a related relationship type.
- From Entity Header - Connected (WPAS 4.1)
- Sets the header wrap code for From Entity in a connected relationship type.
- From Entity Footer - Connected (WPAS 4.1)
- Sets the footer wrap code for From Entity in a connected relationship type.
- From Entity Header - Related (WPAS 4.1)
- Sets the header wrap code for From Entity in a related relationship type.
- From Entity Footer - Related (WPAS 4.1)
- Sets the footer wrap code for From Entity in a related relationship type.
Related Video
Creating and Displaying Relationships
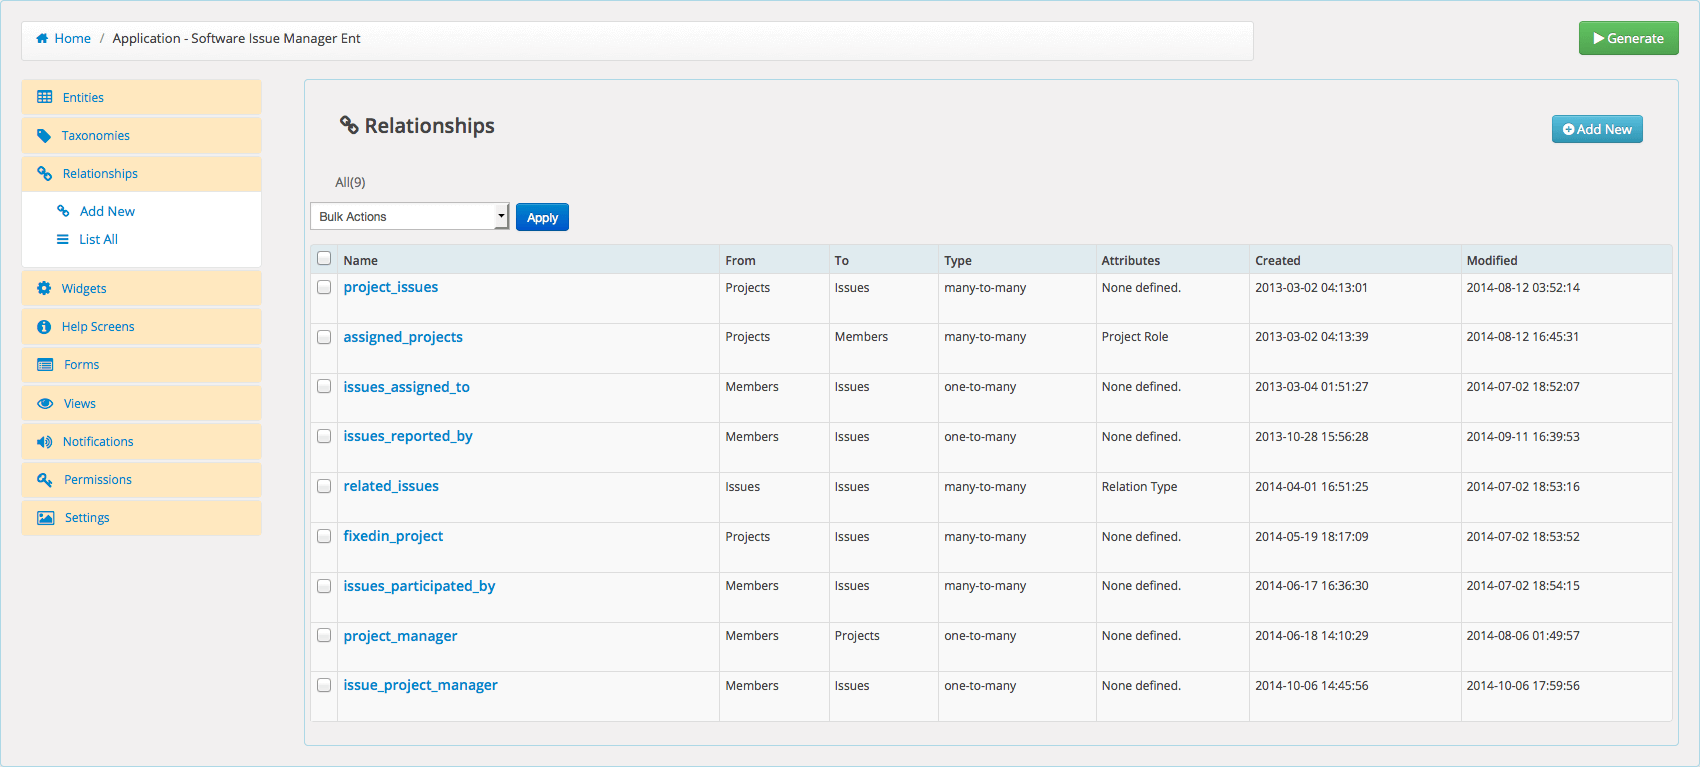
To create a relationship
- Click on the Relationships module.
- Click on the Add New Relationship link, you will see the new relationship screen on the right.
- Add a unique name for your relationship.
- Select "from entity" from dropdown and set its title.
- Select "to entity" from dropdown and set its title.
- Select relationship type between from and to entities.
- Select where to display the relationship box.
- If you checked "Display Connected on the Frontend", fill out the fields in the Connected tab.
- If you checked "Display Related on the Frontend", fill out the fields in the Related tab.
- Click Save to finish.